Description
ecast_chansel makes selecting of Eumetcast data to receive easier,
especially if you want to (de)select channels now and then.
It uses your channels-files to create a small gui with select buttons.
From the selected items it creates a .ini_sel file which is a copy of
the original channels-file, but with non-selected items commented out.
Both old format (recv-channels.ini) and new format (cast-client_*.ini) are supported.
In recv.ini or cast-client_*.ini the location(s) of the channels file(s) needs to be changed,
to point to the generated channels file.
This is the original file name with suffix _sel:
| orig. file | generated file | file in which to change [locations]
|
| Old | recv-channels.ini | recv-channels.ini_sel | recv.ini
|
| New | cast-client-channels_bas.ini | cast-client-channels_bas.ini_sel | cast-client_bas.ini
|
| cast-client-channels_hvs-1.ini | cast-client-channels_hvs-1.ini_sel | cast-client_hvs-1.ini
|
| cast-client-channels_hvs-2.ini | cast-client-channels_hvs-2.ini_sel | cast-client_hvs-2.ini
|
| cast-client-channels_ter-1.ini | cast-client-channels_ter-1.ini_sel | cast-client_ter-1.ini
|
Note that the file names may be anything you want; these are just the default filenames.
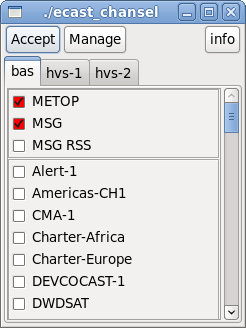
You can specify up to 5 files. Buttons for each file are added into their own tab (see screenshot).
Items in the original file commented out are ignored. This way you can define which items should be selectable.
Each item may have a nickname, which will replace the text near the select button.
See screenshot; here, e.g. EPS-10 has a nickname METOP.
Some points:
- Original files are NOT changed or moved.
- Generated file contains also the nicknames (commented, of course).
- The selector doesn't do anything except while pressing 'Save'. So if you want you may close the tool after selection is done.
- At start the selector reads the original file and the generated file (if it exists). The last is used to set the buttons in the selected state, and to read/use the nicknames, if added.
- The following items are always copied (and don't get a select button):
- WWW-Channel
- items of [config_version]
(these items should not be removed or changed).
Installation
- Linux: untar the file and put it into e.g. $HOME/bin
- Windows: Run the setup. Make sure you enable both the tool and the dll's to install.
The channels filenames are built-in into the program, but you may also specify the names yourself.
This must be done by adding start-options to the command.
The simple method
Make sure you start the tool at the location where the channels-files are.
That's all, if you just need the basic channels file.
In Windows, using the icon, you need to do a few changes:
- Left-click on the icon, select 'Properties'.
- Item 'Start in', define the location of the channels file, e.g.: C:\ecast
- If you want both basic and HVS-1: item 'Target': add option ' -n 2'
- If you also want hvs-2 and ter-1: use -n 3 or -n 4 resp.
- Next time, if you want to reinstall the tool, make sure you check the
'Don't create a Start Menu folder' in the setup program, to prevent that your changed icon
is overwritten. (You may do that by reinstall directly after installation;
this setting is saved, so you can't forget to check the button next time.)
The 'advanced' method
Do the same, but instead of the option -n (which uses the default built-in filenames and
fixed order) use -i option:
ecast_chansel -i cast-client-channels_bas.ini -i cast-client-channels_hvs-1.ini
You can use now any order and/or filenames. Also, you can change the tab-name by using the -t option, e.g.:
ecast_chansel -t basic -i cast-client-channels_bas.ini -t hvs -i cast-client-channels_hvs-1.ini
By default, the tabname is the part between 'cast-client-channels_' and '.ini'.
If files are not in the start-location you must also add the path to each filename,
from the start-location, e.g.
ecast_chansel -i c:\ecast\cast-client-channels_bas.ini -i c:\ecast\cast-client-channels_hvs-1.ini
Up to 5 channels file may be defined.
Test if it works.
- In your original channels file(s), uncomment all items for which you want buttons to (de)select them. (Note: also [*] may have a button, to (de)select everything.)
- Start the tool. You should see tabs for each channels file you defined.
Adding nicknames
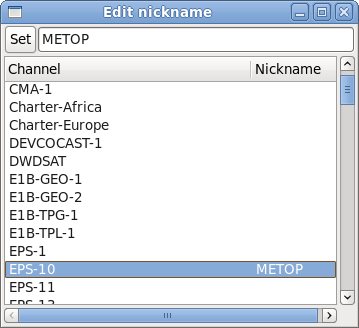
- Start the tool. Select one of the tabs.
- Click on 'edt'. A new window will appear with a list of all items.
- Select the item you want to add a nickname.
- At top, enter the nickname. Click 'Set'.
- Do the same for other items, if desired.
- Close this window. Click 'Save' in the main window.
- Do the same for other tabs.
- Restart the tool. Now the items with nicknames will show up at top, using the nicknames instead of the original names.
Using the tool
- Start the tool.
- Select a tab.
- (de)select items.
- Click 'Save'.
- You may close the tool now, or leave it open.
Note
This tool replaces tqchansel. If you switch to ecast_chansel then
don't use tqchansel anymore!
Best is to remove tqchansel, to prevent confusion.